CLIMATE & ENVIRONMENT
CO2 Supplementation in the Cannabis Grow Room: When It Pays Off and How to Dose It Right
CO2 is the carbon source for photosynthesis. With elevated CO2 (1200-1500 ppm instead of atmospheric 420 ppm), plants can grow faster and achieve higher yields—but only under specific conditions: high PPFD (800+), sealed environment, optimized VPD and temperature, and proper system selection. This guide shows you when CO2 supplementation is profitable, which source to choose, how much gas you need, and how to dose safely without health risks. We also cover the honest cases where CO2 isn't worth it—many growers waste money on systems they can't justify.
In regulated markets with premium pricing (e.g., EU or North America), CO2 often delivers 15-30% yield increases that translate to real profit. But in saturated, wholesale-only markets, the ROI vanishes. This guide helps you calculate your specific break-even and decide whether CO2 is a smart investment for your operation.
Why CO2 is fundamental for photosynthesis and what ppm targets matter
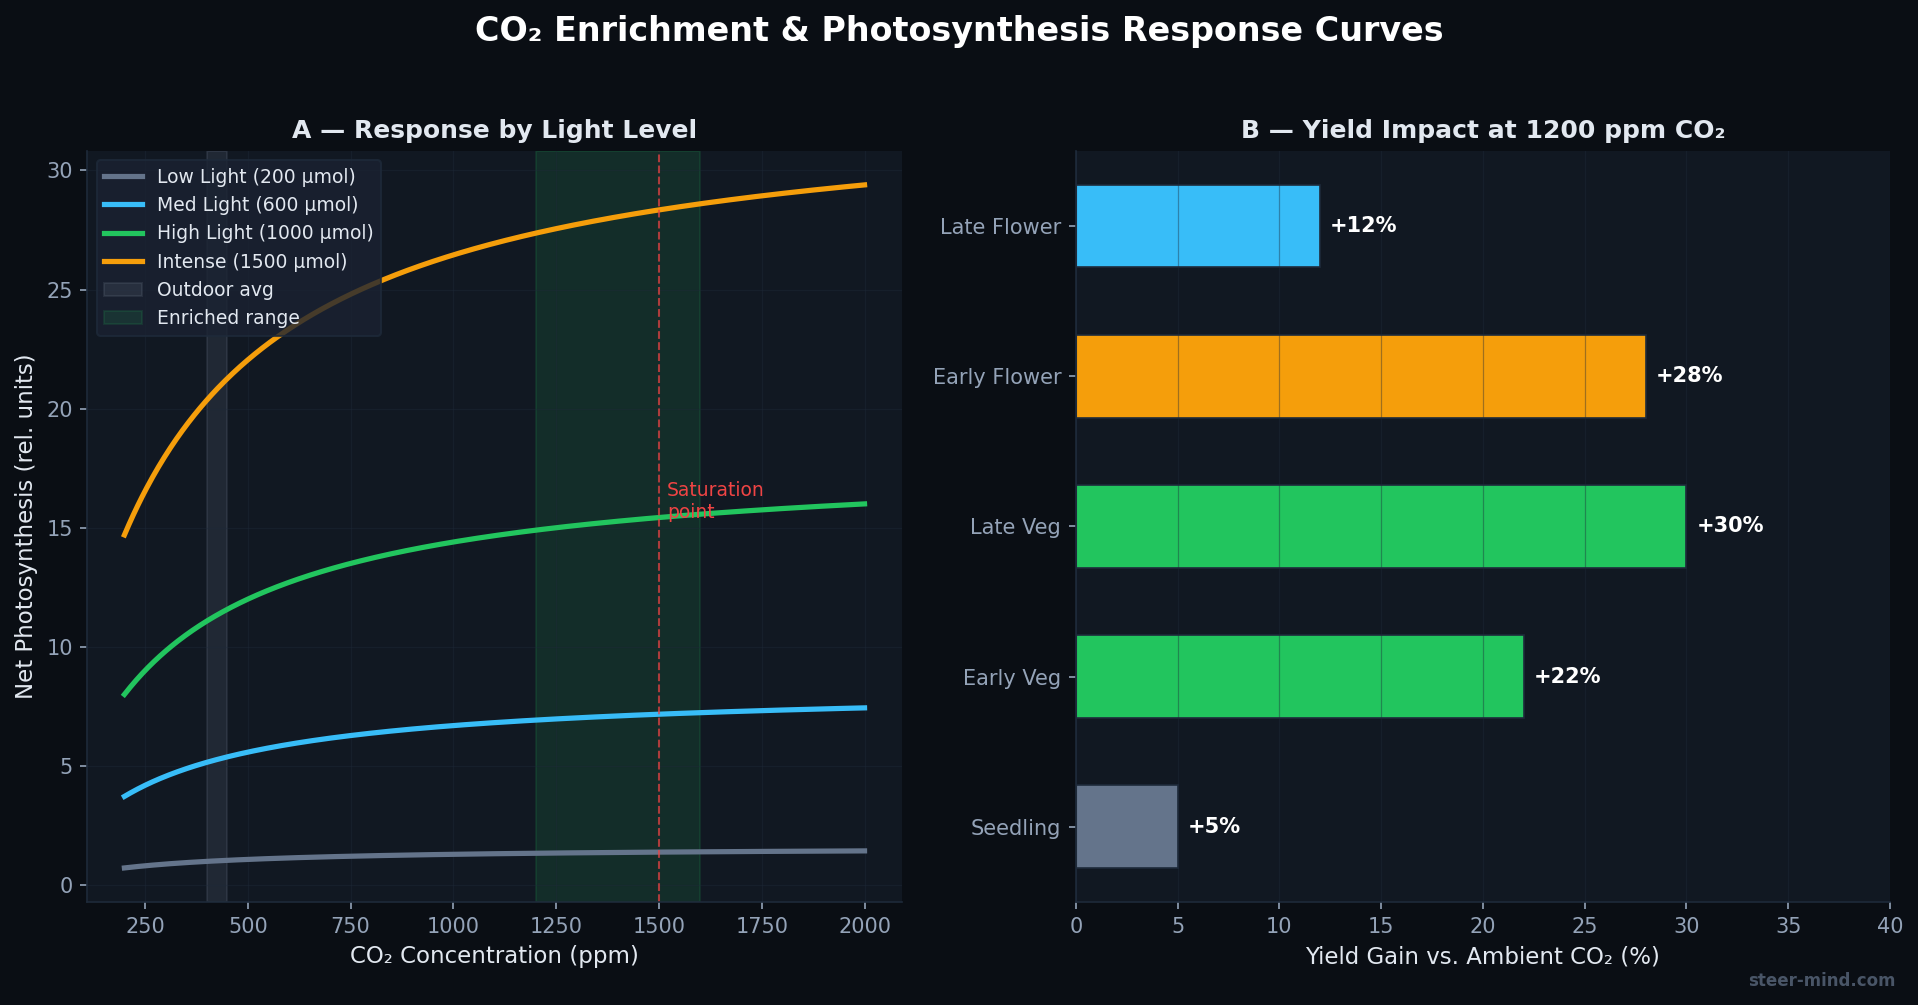
Photosynthesis converts light, water, and carbon dioxide (CO2) into sugars and oxygen. CO2 is absolutely essential—without it, no photosynthesis occurs. Atmospheric CO2 is roughly 420 ppm (0.042%). In a grow room, this can drop (if sealed and plants are hungry) or be actively enriched (with supplementation).
Photosynthesis rate follows a saturation curve with CO2. At low light (under 400 µmol/m²/s), photosynthesis saturates already at 600-800 ppm CO2. At high light (800+ µmol/m²/s), plants can utilize CO2 up to 1200-1500 ppm. Beyond 1500 ppm, no additional benefit—pure waste. Why? Because photosynthesis is limited by multiple factors (light, CO2, enzyme kinetics, temperature). At low light, you hit the ceiling at low CO2; at high light, you need high CO2 to match.
The cost-benefit: Raising CO2 from 420 to 1200 ppm costs money (system, refills, potentially stronger cooling). The yield benefit is typically 15-30% at high PPFD, 0-5% at low PPFD. Break-even profit depends on your market price, electricity cost, and the cost of CO2 and infrastructure. Many small operations skip CO2 because the payoff doesn't justify the complexity.
Core principle: Without sufficient light, CO2 supplementation is pointless. CO2 is only a limiting factor when light and water are adequate. With 800+ PPFD and sealed room, 1200-1400 ppm is optimal. Below 600 PPFD, save your money and invest in better lighting.
A final thought on CO2 and photosynthesis: The relationship between CO2 and light is multiplicative, not additive. Double your light, and CO2 becomes more important. Add CO2 without enough light, and you gain nothing. This is why the sequence matters: optimize light first, optimize environment (VPD, temp) second, and add CO2 as a final lever. Skipping this order wastes money every time.
When CO2 supplementation is economically viable: PPFD threshold
The answer is clear: CO2 becomes worthwhile at about 600 µmol/m²/s PPFD. Below that, light is limiting—CO2 won't help. A 600W LED producing 400 µmol/m²/s? Forget CO2. A high-end LED setup with 1000+ µmol/m²/s? CO2 brings massive yield increases.
| PPFD Range (µmol/m²/s) | Recommended CO2 (ppm) | Economics | Yield Bonus |
|---|---|---|---|
| Below 400 | 400-500 (ambient) | Not profitable | 0% |
| 400-600 | 400-600 | Marginally profitable | 0-5% |
| 600-800 | 800-1000 | Profitable | 8-15% |
| 800-1000 | 1000-1300 | Very profitable | 15-25% |
| 1000+ | 1200-1500 | Highly profitable | 20-30% |
Besides PPFD, the room must be sealed—ventilation equals CO2 loss. Open windows or exhaust fans mean CO2 supplementation is pointless; your CO2 escapes, and you're paying to heat the outdoor air. A sealed room with low air exchange (0.5 changes/day) retains CO2 efficiently. A partially sealed room with 1-2 air changes/day requires double the CO2 input to maintain same ppm. A vented room with 4+ exchanges/day is incompatible with cost-effective CO2 supplementation.
The sealed room requirement: Proper sealing (foam tape on doors, caulk cable holes, weatherstripping, taped light leaks) is a prerequisite for CO2 profitability. Before buying a CO2 system, audit your room for leaks. A typical 1m² door gap can bleed 30-50 ppm CO2/minute in a sealed space. Fix the seals first, then add CO2. Many growers buy expensive CO2 systems only to waste them because their rooms leak.
Quick break-even calculation: CO2 system costs $400 upfront + $30-50/month to operate. A 3m² canopy at ambient PPFD might yield 100g/month. With CO2 at 800+ PPFD, expect 120-130g/month (20-30% boost). At $150/g wholesale, that's $30-45 extra revenue per month. Break-even: 10-15 months. If your market price is $200+/g (retail/premium), break-even is 5-7 months. If selling bulk at $80/g, you may never break even. Know your market before investing.
CO2 sources compared: pressurized tank vs. generator vs. bags
Three main CO2 sources exist, each with trade-offs:
| CO2 Source | Cost | Accuracy | Pros | Cons |
|---|---|---|---|---|
| Tank + regulator + solenoid | $200-400 + refills | Very high | Precise control, no heat, simple, reliable | Logistics, regular refills |
| CO2 generator (propane) | $500-2000 + fuel | Medium | Heat output useful, high flow, no refills | Heat problem in warm rooms, fire risk |
| CO2 bags | $10-30/bag | Very low | Cheap, simple | Unreliable, short duration, uncontrollable |
Comparing real-world performance: A tank system in a 3m × 3m × 2.5m room (sealed) costs $400 initially, then $30-50/month to run (refills + electricity for monitor/solenoid). Over 12 months: $750 total cost for 15-25% yield boost. In a generator-equipped large room (1000+ m³, cold climate), initial cost is high ($2500) but fuel is efficient, so 12-month cost might be $2500+$400 = $2900. The payoff depends entirely on your yield and market price. Cheap beans? Skip CO2. Premium craft flower? CO2 is often worth it. Bags are economic dead-end—you pay $10-30/bag every 1-2 weeks with zero control, poor results. Never use bags as a primary system.
Professional standard: Pressurized tank systems with electronic monitor and solenoid. They enable precise ±50 ppm regulation, are relatively safe and maintainable, and suit 95% of indoor growers.
Dosing CO2 correctly: ppm targets and monitoring
Typical target values for cannabis with CO2 supplementation: Seedling 600-800 ppm, vegetative 1000-1200 ppm, bloom 1200-1400 ppm, late bloom 800-1000 ppm. Stability matters far more than peak values—consistent 1200 ppm beats wild swings between 800-1400. Fluctuations stress plants and reduce growth efficiency. Your goal is steady, predictable CO2.
Dosing strategy varies by growth phase. In seedling (weeks 1-2), keep CO2 conservative (600-800 ppm) because light levels are low and plants can't use high CO2 anyway. In veg (weeks 3-8), ramp to 1000-1200 ppm for maximum growth speed. Early bloom (weeks 1-3) also runs high (1200-1400 ppm) to fuel flower development. Late bloom (weeks 7+) can drop back to 800-1000 ppm because plant metabolism slows and excess CO2 is wasteful. Many growers maintain constant 1200 ppm throughout growth—simpler but less efficient in seedling stage.
Measurement & control: Get a digital CO2 monitor with infrared sensor (Aranet4, SensorData, CO2Meter; ~$200-350). These measure continuously (±30 ppm accuracy) and output a 4-20mA signal to trigger solenoid valves, enabling automatic closed-loop control. Manual monitoring (checking a reading daily and manually opening/closing the valve) is possible but tedious and drifts. Smartphone Bluetooth monitors exist but vary widely in accuracy; stick with stand-alone units.
CO2 dosing schedule: Schedule CO2 delivery only during light hours (e.g., 06:00-18:00 if your lights run then). Photosynthesis only occurs during light; CO2 at night is wasted and just accumulates in the room, risking human safety. Use a timer on your solenoid so it can't inject after lights-off. This simple precaution cuts CO2 consumption by 25-50%. Some advanced setups pair the solenoid timer with the light timer so CO2 automatically starts 30 minutes after lights turn on (warming up the room) and stops when lights turn off.
Monitor and adjust: Check your CO2 monitor daily and log readings. You're tracking: Is the regulator holding setpoint? Does CO2 swing wildly? Is the tank pressure dropping faster than expected? After 1-2 weeks of data, you'll understand your system's behavior and can troubleshoot leaks or regulator drift quickly. This proactive maintenance prevents surprises mid-grow.
VPD adjustment with higher CO2: humidity and temperature
An overlooked effect of higher CO2: Plants reduce stomatal opening (more efficient CO2 uptake). This reduces transpiration. You must increase relative humidity to maintain optimal VPD (0.8-1.2 kPa). At 420 ppm CO2, RH 50-60%. At 1200-1400 ppm CO2, raise RH to 60-70%. Otherwise, plants show drought stress despite adequate water—the combination of closed stomata + low VPD is deadly.
Why this matters: At low CO2 (ambient), plants open stomata widely to scavenge CO2 from the air, increasing transpiration. They "need" lower VPD to prevent water loss. But at high CO2, plants can keep stomata partially closed because CO2 is abundant, reducing transpiration. If you don't raise humidity to match this, the plant experiences relative drought—it's not losing water as fast, so it's as if the air is drier than it actually is. Leaves curl, growth slows, and you blame light when the real culprit is VPD mismatch.
Practical VPD targets with CO2: At 1200 ppm CO2, maintain VPD 1.0-1.4 kPa (up from 0.8-1.2 at ambient CO2). At 25°C room temp, this translates to 60-75% RH depending on exact leaf temp. Many growers using CO2 bump RH from 50% (ambient) to 65-70% and instantly see better growth. The effect is dramatic—stable high humidity with high PPFD and high CO2 is a synergistic combination that unlocks plant potential. Use the VPD Calculator to dial in the exact numbers for your temp and CO2 level. Monitor both, treat them as linked variables, and adjust in tandem rather than individually.
Safety: CO2 monitoring and human health
CO2 is colorless, odorless, invisible, and deadly at high concentrations. Humans can't sense dangerous levels. Here's the exposure scale: 400-1000 ppm (normal air indoors), 1000-2000 ppm (mild headaches, reduced concentration, difficulty thinking), 2000-5000 ppm (severe headache, dizziness, breathlessness, cognitive impairment), above 5000 ppm (loss of consciousness, risk of death).
Your grow room risk: A sealed room with 1200-1400 ppm CO2 is safe for brief maintenance (5-10 minutes) without respiratory issues, though some people report mild dizziness. But if your regulator or solenoid malfunctions and CO2 rises unchecked to 3000+ ppm, anyone working inside is at serious risk. A few minutes at 3000+ ppm can cause confusion and disorientation, leading to unsafe decisions (panic, poor evacuation).
Mandatory precautions: 1. CO2 monitor with audible alarm set at 2000 ppm. Alarm must be outside the grow room (or you won't hear it if inside). 2. Never enter the room during or immediately after CO2 injection; wait 5 minutes and check the monitor reading first. 3. Maintenance work (cleaning, repairs) only with room ventilated and CO2 at ambient levels. 4. Check valve installed between tank and solenoid to prevent backflow/siphoning if pressure drops. 5. Monthly pressure leak checks—a leaking regulator can empty a tank in days, and a full tank escaping instantly is a hazard. 6. Post warning sign on the door: "CO2 Grow Room—Danger—Do Not Enter." 7. Emergency evacuation plan: know where to go if you feel dizzy inside. 8. Tell family/roommates never to enter the grow room alone; always have a buddy who can pull you out if needed.
CO2 safety is non-negotiable. Yield is not worth a hospital visit or worse. Invest in a good monitor (~$300) as insurance. It's the cheapest and most important part of your CO2 system.
CO2 injection systems compared: tanks, generators, bags
Three main CO2 delivery methods exist for grow rooms, each with distinct advantages and drawbacks. Understanding the differences helps you choose the system that matches your grow size, budget, and technical comfort level. Your choice here directly impacts yield consistency, safety, operating cost, and long-term profitability. Picking the wrong system can cost thousands in wasted gas, missed yields, or equipment failures.
Pressurized tanks (bottled CO2) remain the industry standard for serious growers. A steel or aluminum cylinder contains liquefied CO2 at high pressure. A regulator reduces pressure to 2-4 bar, and a solenoid valve controls flow based on a CO2 monitor's setpoint. This system offers the most precision: ±50 ppm control is achievable. Think of it as a "manual fuel injection" system—your monitor is the computer telling the solenoid when to open/close. Tanks come in various sizes (5 lbs, 10 lbs, 20 lbs, etc.). A 10 lb tank typically lasts 2-6 weeks depending on room size and exchange rate (how often you swap exhausted air). Refills cost $10-20 depending on location. Initial investment: $300-500 (tank, regulator, solenoid, monitor). This system produces no heat, takes no space (sits in corner), and is fully controllable. The downside: logistics (tank swaps), no backup if regulator fails, requires basic plumbing skills for installation, and monthly maintenance (leak checks).
| System | Upfront Cost | Operating Cost/Month | Control Precision | Heat Output | Room Size Fit |
|---|---|---|---|---|---|
| Pressurized Tank | $300-500 | $20-50 | Very high (±50 ppm) | None | All sizes, ideal for 2-6m² |
| CO2 Generator (Propane) | $500-2000 | $30-80 | Medium (±200 ppm) | High (~2-5 kW) | Large rooms, cold climates |
| CO2 Bags | $0 (bags only) | $10-30 | Very low (uncontrolled) | None | Tiny tents only, emergency backup |
CO2 generators (propane or natural gas combustion systems) burn fuel to produce CO2 as a byproduct. They're bulky, hot, and loud. In a cold room (below 15°C), the heat output is actually beneficial for maintaining temperature. But in normal climates, that heat is a liability—you need cooling capacity to offset it. Generators produce CO2 continuously; you can't dial down output precisely. They're typically sized for large operations (10+ m² rooms). A 2kW generator produces ~1500 ppm CO2 in a 6m² room but also raises temps 2-3°C. Maintenance is higher (spark plugs, fuel lines, safety checks). Cost is steep: $1500-3000 upfront plus fuel. Use a generator only if: (1) your room is naturally cold, (2) you have large space (>10m²), (3) you're experienced with gas safety. For most indoor growers, the risk/complexity/cost of a generator outweighs the benefit of a tank system.
CO2 bags (disposable bags emitting CO2) are cheap ($10-30 per bag, lasts 1-2 weeks) but hopeless for any serious grow. They produce uncontrolled, declining CO2 levels—you have no idea if you're at 400 or 800 ppm. Yields suffer from inconsistent CO2. Use bags only in a pinch (your tank failed, waiting for refill) or in a tiny 0.5m² propagation box. Don't rely on bags for main production.
Recommendation: For 95% of cannabis growers (bedroom to medium commercial), pressurized tanks are the best choice. They balance cost, control, and reliability. Generators suit large operations in cold climates. Bags are emergency backup only. Start with a tank system, gain experience, measure results, and only upgrade to a generator if your operation scales significantly and cold-climate benefits justify the investment.
Calculating CO2 consumption: how much gas do you need?
How often do you need to refill your CO2 tank? The answer depends on room size, air exchange rate (ventilation), and target ppm. Understanding consumption helps you budget and plan maintenance.
Basic formula: Daily CO2 consumption (liters/day) = Room volume (m³) × (Target ppm - ambient ppm) × exchange rate (air changes/day) ÷ 1,000,000 × 24 hours ÷ 1000.
Simplified: A rough estimate is 50-100 liters of CO2 per day per m² of canopy for a sealed room (low exchange) at 1200 ppm target. In a partially sealed room with 1-2 air exchanges per day, consumption doubles or triples.
Example calculation: A 3m × 3m × 2.5m high room = 22.5m³. Target 1200 ppm. Ambient 420 ppm. Sealed room (0.5 air exchanges/day). Daily consumption ≈ 22.5 × (1200-420) × 0.5 ÷ 1,000,000 × 24 = ~0.24 m³ = 240 liters/day. A 10 lb tank (~4.5 kg) contains ~2250 liters of gas. 2250 ÷ 240 = 9.4 days per tank. Budget a refill every 1.5 weeks, costing ~$15 each. Monthly cost: ~$30.
If the same room has moderate ventilation (2 air changes/day, typical for vented rooms), daily consumption triples: ~720 liters/day. A 10 lb tank lasts ~3 days. You'd refill 10 times/month at $150/month cost. At this level, a generator becomes economical; a larger tank (20 lbs) reduces refill frequency.
| Room Volume | Air Exchange Rate | Est. Daily Consumption | 10 lb Tank Lifespan | Monthly Cost |
|---|---|---|---|---|
| 10m³ (2×2.5×2m, small tent) | Sealed | ~100 L/day | 22 days | ~$15 |
| 22m³ (3×3×2.5m, closet) | Sealed | ~240 L/day | 9 days | ~$45 |
| 22m³ | 1 air change/day | ~480 L/day | 5 days | ~$90 |
| 22m³ | 2 air changes/day | ~960 L/day | 2 days | ~$150 |
Key insight: Sealed rooms are far more efficient with CO2—you lose less to ventilation. If your room currently has 2+ air changes/day and you're considering CO2, first seal it better (tape gaps, upgrade door seals). This can cut CO2 consumption by 50-75%, making the system profitable.
Real-world refinements: The calculations above are theoretical averages. Real consumption varies based on: (1) Regulator adjustment—if set too high or low, you waste gas or undershoot target. (2) Time of day—morning and afternoon likely need CO2 injection; evening less so (lower photosynthesis). (3) Plant maturity—seedlings need less CO2 to saturate than blooming plants. (4) Weather—on cool days, vents are open more, increasing loss. Budget higher than the table if your room isn't perfectly sealed. And always include a safety margin: if the table says 1 week per tank, assume 5 days and keep a spare tank on hand.
Pro tip: Many growers underestimate CO2 consumption and run out mid-week, forcing them to reduce setpoint or skip CO2 until refill. This inconsistency hurts yields more than no CO2 at all. Keep two spare tanks on hand; rotate your active tank, so you never scramble. At $15-20 per refill, the extra buffer is cheap insurance. Additionally, track your actual consumption against the table—if you run out earlier than predicted, your room is leakier than assumed, and sealing improvements will pay off immediately.
When CO2 is NOT worth it: honest assessment
CO2 supplementation sounds appealing—higher yields! But it's not universally profitable. Many growers waste money on CO2 systems that never pay off. Here's an honest assessment of when to skip CO2:
Reason 1: Your PPFD is below 600 µmol/m²/s
Below 600 µmol/m²/s, light is the limiting factor for photosynthesis, not CO2. Even if you pump 1500 ppm CO2 into a low-light room, plants can't use it—light won't allow. They'll hit photosynthesis saturation at 400-500 ppm with inadequate light. Adding CO2 is pure cost. First: raise your light. Install better LEDs, reduce distance, add fixtures. Only after hitting 700+ µmol/m²/s does CO2 become the bottleneck. Cost: moderate (new LEDs $500-1500) but pays off through faster growth, even without CO2.
Reason 2: Your VPD and temperature control are suboptimal
High CO2 requires precise humidity and temp control. If your VPD swings 0.5-2.0 kPa daily, if humidity spikes to 80% at night or drops to 35% by afternoon, if temps fluctuate 15-28°C, then plants are already stressed. Adding CO2 to an unstable environment usually makes things worse (more transpiration demand compounds the VPD problem). First: dial in climate control. Get a humidifier, dehumidifier, thermostat, and monitor. Stable 22-25°C and 60-70% RH for 2 weeks. Then add CO2. Cost of climate: $300-800, but transforms yields even without CO2.
Reason 3: Your room temperature exceeds 28°C regularly
Above 28°C, photosynthesis slows sharply, and plants prioritize cooling over growth. High CO2 aggravates this—more CO2 = more transpiration = more cooling demand. If you can't maintain 22-26°C (e.g., outdoor ambient is 35°C in summer), CO2 won't help. You need AC first. Cost is brutal ($1500-5000), but without it, no amount of CO2 saves a hot room. A cooler room often matters more than CO2.
Reason 4: Your budget is limited and electricity costs are high
CO2 supplementation costs money (system + refills + potential AC/humidity control upgrades). If electricity in your area costs $0.20+ per kWh and your profit margin is thin (e.g., selling wholesale in a saturated market), the ROI doesn't pencil out. Example: CO2 costs $50/month, AC costs $100/month (if needed). That's $1800/year for perhaps a 15-20% yield boost. In a 4m² room growing 200g/month, you gain 30-40g, worth ~$150-300 wholesale (depending on market). Break-even is 6-24 months. If you plan to grow for less than a year, skip CO2. If you're already tight on margin, don't add it.
When TO add CO2: You have 700+ µmol/m²/s light, stable VPD, room temps 22-26°C, sealed room, and 1-2 year+ grow plan. Then CO2 is worthwhile. Expected ROI: 4-8 months depending on market. Premium quality flower in regulated markets can justify CO2 quickly. Wholesale commodity grows may never justify it.
For guidance on your specific setup, use the VPD Calculator to assess your environment. If your current VPD is erratic or your PPFD is low, focus on those before CO2. Fixing climate and light first will boost yields 20-50% with zero additional cost, often more than CO2 alone. Be honest with yourself: does your setup actually need CO2, or are you looking for a shortcut? The best growers fix fundamentals first, then optimize with CO2.
Frequently Asked Questions about CO2 Supplementation
At what PPFD does CO2 supplementation truly pay off?
CO2 becomes worthwhile at around 600 µmol/m²/s. Below that, light is limiting. With 800+ µmol/m²/s and sealed room, expect 15-30% yield increase from CO2 at 1200-1500 ppm. The investment (~$300-400) pays for itself through increased yields.
How do I measure CO2 ppm accurately?
Digital CO2 monitor with infrared sensor (Aranet4, SensorData, CO2Meter) is most accurate at ±30 ppm. Smartphone apps are unreliable. For closed-loop control, monitor must output 4-20mA signal to solenoid.
Is CO2 dangerous in sealed grow rooms?
Yes—above 2000 ppm is hazardous for humans (headaches, dizziness, breathing problems). 1200-1400 ppm for brief maintenance is OK (5-10 min). Always: use CO2 monitor with alarm, ventilate before service work, check for leaks monthly. Safety first.
How does higher CO2 affect humidity and VPD requirements?
Elevated CO2 reduces plant transpiration (stomata stay more closed). You must raise humidity to keep VPD optimal. Typical: 420 ppm → RH 50-60%, 1200-1400 ppm → RH 60-70%. Without this adjustment, plants suffer drought stress despite water availability.
What's the safest CO2 source: tank, generator or bags?
Pressurized tanks with regulator and solenoid are safest and most controllable. Generators produce heat (useful in cold rooms) but are uncontrolled. Bags are unreliable. Professional choice: tank + monitor + solenoid.
Getting started: first steps with CO2 supplementation
If you've decided CO2 is right for your setup, here's how to begin responsibly. First, audit your room for leaks. Seal large gaps with foam tape. Then install a monitor before the tank—measure ambient CO2 for a week to establish baseline. You should see stable ~420 ppm in a vented room.
Next, install the tank+regulator system: place the tank securely in a corner (away from foot traffic), connect the regulator, add a solenoid and check valve, and wire the solenoid to your monitor. Program the monitor to maintain 1000 ppm (start conservative; increase after a week). Test for leaks by listening for hisses and checking regulator pressure (should stay stable for hours). If pressure drops, there's a leak—find and seal it before injecting CO2.
Once running, log your CO2 levels daily for 2 weeks. You're learning: How much gas does your tank lose per day? At what time do plants seem to saturate (ppm stops rising even though injector runs)? Do you see yield improvements at week 4-5? Use this data to optimize. Many growers find a sweet spot at 1100-1200 ppm rather than pushing to 1400 because the yield gain above 1200 is marginal and the cost/complexity jump is real. Document everything—this knowledge becomes invaluable for scaling to multiple rooms or mentoring other growers.
Safety check: Before your first grow with CO2, brief any family or friends who may access the space. Teach them: "Don't enter the grow room without permission. If you feel dizzy, leave immediately and call for help." Post warning signs. Know where your nearest hospital is in case of accidental over-exposure.
After 2-3 grows with CO2, you'll develop intuition. You'll recognize how your room responds, how long a tank lasts, what ppm yields your best quality, and whether the cost is justified for your market. Some growers run CO2 only during bloom (saving gas) or only in peak veg (maximizing growth). Others go year-round. Your practices will evolve. The key: start safe, measure everything, and iterate based on data—not guesses.
Final reminder: CO2 supplementation is a tool, not a requirement. Many successful, profitable growers skip CO2 entirely and focus on optimizing light, VPD, nutrients, and genetics instead. CO2 works best as a force multiplier for growers who've already nailed the fundamentals. If your lights are weak, your climate erratic, or your budget tight, don't force CO2. Master the basics first. CO2 can wait.
Take the time to monitor, learn, and document. The small grower who obsesses over data and tweaks incrementally will eventually outpace the one who throws money at expensive systems without understanding their setup. Patience, measurement, and iteration—these are the true keys to profitability in any growing operation, with or without CO2.
Summary and next steps
CO2 supplementation is powerful but context-dependent. It works best in sealed, high-PPFD, environmentally stable grow rooms where growers have already optimized light, VPD, and nutrients. In these conditions, CO2 delivers 15-30% yield increases and a favorable ROI.
Before investing: audit your PPFD (is it 700+?), seal your room, stabilize your VPD and temperature. Only then consider CO2. And remember: no system is foolproof. Regular monitoring, maintenance, and documentation ensure long-term success. Good luck, and grow responsibly.