NUTRIENTS & FEEDING
Cannabis Nutrient Schedule: EC Table and Phase Plan for Every Substrate
A structured cannabis nutrient plan is the foundation for healthy growth and optimal yields. With the right EC values and NPK ratios for each growth phase, you avoid deficiency and toxicity symptoms. This guide shows you how to build a nutrient plan from scratch—with practical tables for coco, soil and hydroponics.
Why a structured nutrient plan improves cannabis yields
Cannabis requires different nutrient ratios during different growth phases. Ad-hoc feeding creates stress and reduces yields. A structured plan enables precise dosing, reproducible results and early problem detection. Professional growers work with written plans—and you should too.
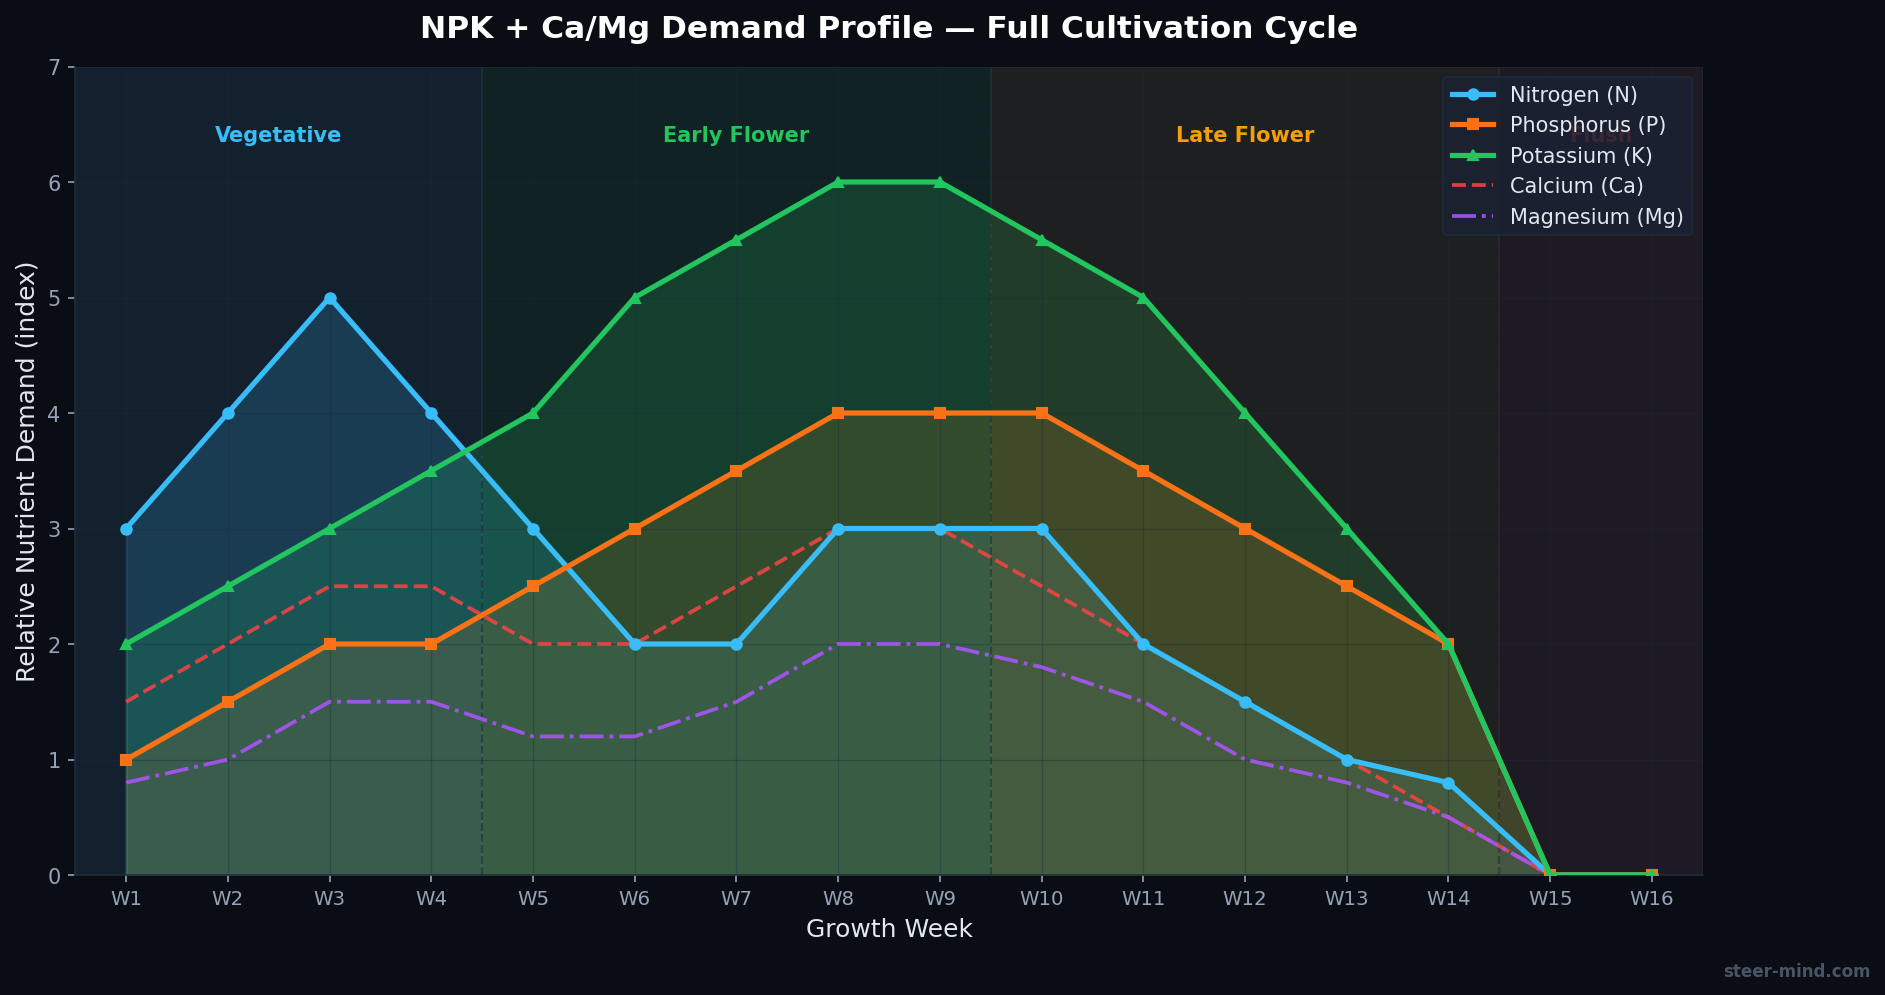
The idea behind a nutrient plan is simple: each growth phase has different optimal nutrient requirements. In the vegetative phase, the focus is on stem growth and leaf mass—nitrogen is dominant. In the flowering phase, the plant shifts to reproduction and cell wall stability—phosphorus and potassium become more important. A good nutrient plan orchestrates these transitions instead of ignoring them.
Core principle: A nutrient plan isn't rigid—it's a framework you test, measure and adjust. The best growers document everything and improve their plans across multiple harvests.
NPK ratios per growth phase: table for veg, early and late bloom
NPK stands for the three macronutrients Nitrogen (N), Phosphorus (P) and Potassium (K). Their ratio determines a fertilizer's character. Cannabis needs different NPK ratios in different phases—a universal 10:10:10 fertilizer is often not ideal.
| Growth Phase | Typical NPK Ratio | Focus and Characteristics |
|---|---|---|
| Seedling (weeks 1-2) | 6:3:3 or lightly fed | Minimal nutrients—young plants are sensitive. Often just water is enough. |
| Vegetative (weeks 3-8) | 10:5:5 or higher | Nitrogen dominant—promotes stem, leaf and root growth. N should be 50-60% of macronutrients. |
| Transition (light switch, 1-2 weeks) | 8:7:7 or transition nutrient | Gradual N reduction, P/K increase. Some growers use a transition nutrient, others reduce gradually. |
| Early Bloom (weeks 1-3) | 5:10:9 or 4:10:10 | Bloom booster ratio—phosphorus and potassium dominant. N drops significantly to avoid overfertilization. |
| Mid to Late Bloom (weeks 4-7) | 4:8:8 or 5:8:7 | P/K stay high, N reduces further. Micronutrients (Mg, Ca) become critical in this stage. |
| Late Bloom & Maturation (week 8+) | 2:6:8 or lower | Minimal N, K sometimes raised again. Some growers use potassium-only drench in final days. |
Pro tip: Check your fertilizer bottle labels. Good fertilizer companies offer phase-stabilized products (veg and bloom). If your fertilizer has a fixed NPK ratio, you must switch between two products or mix ratios.
A common mistake is not reducing nitrogen adequately in bloom. Cannabis that receives too much nitrogen in bloom delays maturity, produces less compact flowers and has reduced taste quality. Conversely, too little N causes leaf yellowing and reduced yields.
EC values for cannabis: targets for coco, soil and DWC compared
EC (Electrical Conductivity) measures solution conductivity and indicates how many dissolved salts it contains. EC is the numerical tool to control nutrient amount—not the bottle labels, but the actual measured EC.
| Phase | Coco Cultivation | Soil Cultivation | Hydroponics (DWC) |
|---|---|---|---|
| Seedling (1-2 weeks) | 0.4–0.6 | 0.2–0.4 | 0.3–0.5 |
| Vegetative phase | 1.0–1.4 | 0.8–1.2 | 1.0–1.6 |
| Early bloom | 1.2–1.6 | 1.0–1.4 | 1.3–1.8 |
| Mid bloom | 1.2–1.6 | 1.0–1.3 | 1.2–1.7 |
| Late bloom (weeks 7-8) | 0.8–1.2 | 0.6–1.0 | 0.8–1.3 |
| Flush (last 2 weeks) | 0.2–0.5 | 0.2–0.4 | 0.2–0.5 |
Why do EC values differ between substrates? Coco and hydroponics are inert media—no buffering like in soil. Plants depend on the exact solution. Soil contains organic matter and biology that buffer nutrients—too high EC can cause salt burn.
A practical rule: Measure your input solution EC (what you feed) and later the runoff EC. If runoff EC is much higher than input, salt is accumulating in the substrate. Then flush with plain water.
Building your nutrient plan step by step
Follow this method to create your own functioning nutrient plan:
-
Step 1: Choose substrate and fertilizer
First, decide on your substrate (coco, soil or hydroponics) and select a fertilizer optimized for it. Coco fertilizers are designed to tolerate higher EC. Soil fertilizers are often weaker. Hydroponics fertilizers are precisely balanced for optimal nutrient uptake. Check bottle labels for NPK ratio.
-
Step 2: Define base EC values for each phase
Use the table above to choose EC targets for your strain and substrate. A good starting point: vegetative 1.2 EC (coco), early bloom 1.4 EC, late bloom 1.0 EC. Write down these values—they become your reference framework.
-
Step 3: Calculate fertilizer dose and calibrate
Each fertilizer has different concentration. The manufacturer states how much mL per liter of water is needed to reach a certain EC (or EC increase per mL). Example: "1 mL A + 1 mL B per liter increases EC by 0.4." Start with the dose that reaches 80% of your target EC, then increase gradually. Measurement is critical—buy an EC meter (cheap and essential).
-
Step 4: Document, observe and adjust
Keep a grow log (see Grow Data Logging). Note daily input EC, runoff EC, pH and plant condition. After 2-3 weeks, you'll see patterns: If runoff EC rises, you were too generous. If it drops, you can increase. Document multiple harvests—this data becomes gold for developing your personal masterpiece.
Professional tip: Some growers target runoff EC ranges (e.g. input 1.4 EC, runoff should be 1.6-1.8). This signals active feeding. Runoff over 2.0 = too much salt, runoff below input = potential deficiency developing.
Common nutrient plan mistakes and how to avoid them
Many beginners make similar mistakes. Here are the most common—and how to prevent them:
-
Mistake 1: Not switching between veg and bloom
Some growers use the same product throughout. This leads to nitrogen excess in bloom and poor flower quality. Plan a nutrient switch for the first week after light cycle change. For autoflowers: switch around weeks 4-5.
-
Mistake 2: Starting too high with EC and not adjusting
A common reaction to deficiency symptoms is increasing EC. This usually makes it worse. Start conservative (80% target EC) and increase slowly based on plant condition and runoff measurements. Don't jump 0.5 EC at once.
-
Mistake 3: Not using an EC meter
This is fatal. Without EC measurement, you work blind. EC meters cost $20-50 and save you hundreds in lost harvests. Buy a digital meter and calibrate monthly.
-
Mistake 4: Flush phase too short
If you flush less than 7 days (e.g. 2-3 days), nutrient residues remain in the flower. This results in poor burn quality and unwanted taste. Always flush 7-14 days.
Flush phase and nutrient removal before harvest
The flush phase is a 7-14 day period shortly before harvest when you water only with plain water—no nutrients. The goal is to remove remaining nutrients from the substrate so flowers burn clean and taste better.
Timing: Start the flush phase about 10-14 days before planned harvest date (based on trichome maturity—see Harvest Timing and Trichomes). This is usually week 7-8 of bloom for 8-10 week strains.
Flush protocol: Water with pH-adjusted water (pH 6.0-6.5 for coco, 6.5-7.0 for soil). Amount should be 2-3x substrate volume to ensure thorough rinse. Many growers do two flushes: day 1 generous flush, day 3-5 another flush. Runoff EC should drop to 0.3-0.5 after flushing.
Pro tip: Modern growers sometimes shorten flush to 3-5 days if they have precise EC control. Beginners should stay with 10-14 days—it's the safe option and costs less.
Nutrient schedule adjustment: reading plant signals
A printed nutrient schedule is a starting point, not a prescription. Cannabis plants communicate their actual needs through foliage, growth rate, and runoff data. Learning to read these signals and adjust your schedule accordingly separates experienced growers from beginners.
| Plant Signal | Likely Cause | Schedule Adjustment |
|---|---|---|
| Dark green, claw-like leaves (nitrogen claw) | N toxicity or excess EC | Reduce overall EC by 0.3–0.5, lower N ratio |
| Pale new growth, yellowing upward | N deficiency or pH lockout | Check pH first; increase N if pH is correct |
| Purple stems without cold temperatures | P or Mg deficiency | Increase PK base and add CalMag |
| Brown leaf tips on lower leaves | K excess or Ca/Mg competition | Reduce EC, check Ca:Mg:K ratio |
| Intervenal chlorosis on mid leaves | Mg or Fe deficiency | Add MgSO4 foliar, check pH (Fe locks below 5.8) |
| Rapid growth with large internodal gaps | DLI too low or N excess | Increase PPFD; reduce N slightly |
Week-by-week nutrient schedule: practical EC targets
The following EC targets provide a universal starting framework. Adjust based on runoff EC (target: ±0.3 of feed EC) and visible plant signals. This schedule assumes coco substrate with daily or near-daily watering. Soil growers should reduce EC values by 0.2–0.4 throughout.
| Week | Phase | Feed EC (coco) | N:P:K Focus | Key Addition |
|---|---|---|---|---|
| 1–2 | Seedling | 0.6–0.8 | High N, low PK | Light CalMag |
| 3–5 | Vegetation | 1.2–1.6 | High N, medium PK | CalMag, silica optional |
| 6–7 | Transition | 1.4–1.8 | Medium N, rising PK | Begin PK booster |
| 8–11 | Peak Flower | 1.6–2.0 | Low N, high PK | PK boost, amino acids |
| 12–13 | Flush / Finish | 0.4–0.6 | Minimal | Plain water or flush agent |
How to use this schedule in practice
Week numbers are approximate—adapt to your strain and growth speed. Fast-growing sativas may transition to bloom after week 5; compact indicas may stay vegetative until week 8. Use the visible growth stage (not just the week counter) as your reference.
The EC values listed are input EC, what you feed into the substrate. Monitor runoff EC closely: if it exceeds input EC by more than 0.4, you're feeding too aggressively. If runoff EC drops below input EC, the substrate is being depleted—increase feeding strength or water more frequently.
Transition week strategy
The transition weeks (6–7) are critical. Some growers do a hard switch to bloom nutrient; others prefer a gradual transition. Gradual is safer: over 3–5 days, slowly reduce the veg nutrient and introduce the bloom nutrient. This prevents shock and nutrient lockout. Watch for temporary leaf yellowing during transition—it's often harmless, but if it spreads quickly, your transition was too aggressive.
Seedling EC management — why light feeding matters
Weeks 1–2 require extra caution. Seedlings have small root systems and low metabolic capacity. Overfeeding at this stage causes burned cotyledons and stunted growth. Many successful growers use just 0.6 EC with only water and a tiny amount of CalMag, or use seedling-specific nutrient formulations. The investment of 2–3 extra days of very light feeding pays dividends in robust early growth and fewer deficiency surprises later.
Flush phase EC targets and nutrient clearance
The final flush (weeks 12–13) is not just low EC—it's typically a complete nutrient removal phase. Running EC from 0.4 to 0.6 means minimal salts in the solution, with most applications using plain pH-adjusted water. Some growers add a commercial "flush" product which is mostly chelated micronutrients and sugars, helping the plant mobilize remaining nutrients out of the tissues. The goal is clean-burning flowers with minimal nutrient residue.
Mid-bloom peak feeding (weeks 8-10): maximum yield window
Weeks 8–10 are the critical yield-determining window. Flowers are sizing and resin production peaks. This is when you want EC at its highest (1.6–2.0 for coco) with maximum PK and supporting micronutrients. However, this is also where many growers over-feed. Monitor runoff EC carefully: if it exceeds 2.2–2.4, reduce slightly. A common professional approach: target runoff EC of 1.8–2.0 when input is 1.8—this signals active feeding without accumulation.
Micronutrient considerations throughout the cycle
While this schedule focuses on NPK and EC, don't forget supporting micronutrients: calcium, magnesium, iron, manganese, zinc, boron, molybdenum. Most commercial two-part or three-part nutrient sets include these, but coco growers must always add CalMag—it's non-negotiable. In hydroponic systems, some growers reduce CalMag slightly; in coco, use it at recommended dosage throughout the entire cycle. Micronutrient deficiency becomes apparent around week 4–5 of bloom; by then it's late to correct without yield impact.
Monitoring and real-time adjustment
This schedule is a starting point, not a rigid formula. Professional growers check runoff EC daily and adjust within 24–48 hours if needed. If runoff EC jumps suddenly, reduce feeding strength. If runoff EC drops below input EC, increase strength. This active management is what separates consistent yields from chaotic ones. You'll develop feel after 2–3 cycles, but always back it with measurements. Remember: data doesn't lie—follow your EC meter, not your intuition alone.
Summary: Your three-step framework
Start simple: (1) Choose EC targets per phase and write them down. (2) Measure input and runoff EC daily. (3) Adjust within 24–48 hours if runoff deviates by more than 0.3 from input. This system works for every strain, every substrate, every grower. It's the foundation of professional cannabis cultivation.
Frequently Asked Questions about Cannabis Nutrient Schedules
How much EC do cannabis plants need in vegetative and flowering stages?
Cannabis in the vegetative stage requires EC values between 1.0 and 1.4 (depending on strain and substrate). In the flowering stage, EC values should be 1.2 to 1.6—lower as you approach harvest (late bloom 0.8-1.2 EC). Exact values depend on substrate: coco tolerates higher EC than soil. Always measure with an EC meter, not bottle labels.
What does NPK mean for cannabis and why do ratios change between phases?
NPK stands for Nitrogen (N), Phosphorus (P) and Potassium (K)—the three main nutrients. In vegetative phase, cannabis needs lots of nitrogen (N) for leaf and stem growth, so a 10:5:5 ratio is ideal. In flowering phase, the plant shifts to reproduction—phosphorus and potassium become more important (e.g. 5:10:9 ratio). Too much nitrogen in bloom leads to slow maturity and poor flower quality.
When should I switch to bloom nutrient?
Switch to bloom nutrients once you've changed the light cycle to 12/12 hours and the first flower sites are visible (usually 7-14 days after light change). For autoflowers, switch around weeks 4-5 when bloom starts naturally. A gradual transition (slowly reducing veg nutrient over 1-2 weeks) is better than abrupt switching.
How long before harvest should I stop feeding (flush)?
A flush phase of 7-14 days is standard. Start flushing about 10-14 days before your planned harvest date (determined by trichome maturity). Water only with pH-adjusted water, no nutrients. This removes nutrient residues from the substrate and improves taste and smoke quality. With flush: lighter burn, better taste. Without: darker smoke, harsher.
Do I need Calcium and Magnesium (CalMag) supplements?
In coco substrates, CalMag is almost always necessary. Coco binds calcium and magnesium, making them less available to plants—so 2-5 mL CalMag supplement per liter is recommended. In soil, it depends on soil quality—good universal fertilizers include CalMag, but extra won't hurt. Symptoms: leaf margins curling (Mg deficiency), stem discoloration, vein discoloration. If you see these, add more CalMag.