Technique
Cannabis SCROG Setup: Net Training for Even Canopy and Maximum Yield
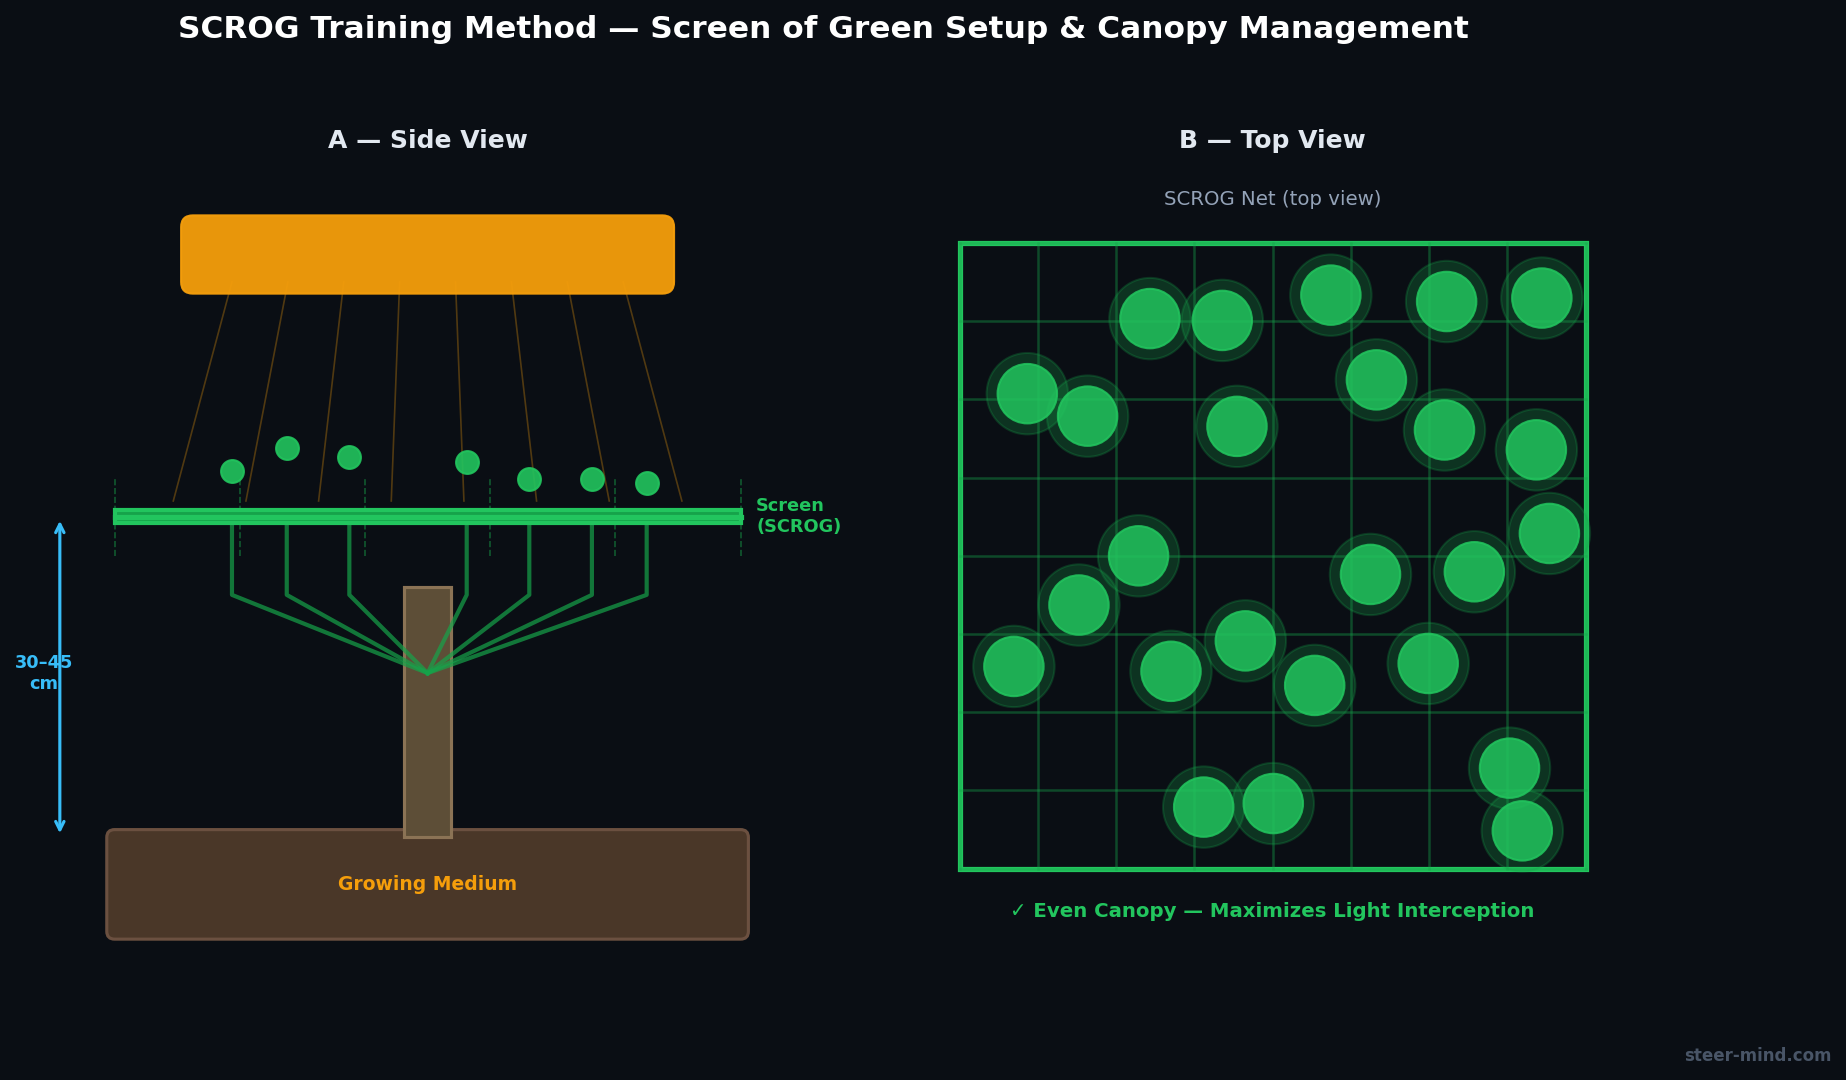
SCROG (Screen of Green) is a passive training method that creates a flat, highly-illuminated canopy by distributing branches over a net. This optimizes light utilization and can increase yields by 20-30% – without aggressive cuts that cause stress.
Physiology: Breaking Apical Dominance and Light Utilization
Cannabis exhibits strong apical dominance: the top shoot (apex) suppresses lateral shoots via auxin hormone distribution. The result: one large upper bud, many weak lower buds – poor structure.
SCROG solves this via passive horizontalization: all branches spread over a net. This signals the plant that multiple apex points exist, triggering lateral development. Simultaneously, all branches receive full light – not just the top.
PPFD and Photosynthesis Efficiency
In untrained canopy, lower PPFD (Photon Flux Density) is often 50-70% lower than top. These areas produce little. With SCROG, an even surface is created where 80-90% of the canopy receives optimal light. Result: higher total yield on same fixture.
Key Advantage: SCROG needs neither defoliation (which stresses) nor aggressive cutting. It's the most elegant canopy optimization – passive, stress-light, and effective.
SCROG Setup: Net and Installation
Net Material and Mesh Size
| Material | Mesh Size | Advantages | Disadvantages |
|---|---|---|---|
| Hemp Net | 5x5 cm or 10x10 cm | Gentle on branches, stretchy, easy handling | Less durable, rots after 2-3 cycles |
| Bamboo Net | Variable | Natural material, durable, thin and discreet | Pricey, difficult to tension, less flexible |
| Plastic/Nylon | 5x5 cm to 10x10 cm | Very durable (5+ years), cheap, easy to clean | Less gentle on branches, can splinter |
| Stainless Steel | Variable | Extremely durable, reusable many times | Expensive, stiff, hard to handle, rust potential |
Best for Beginners: Hemp or plastic net with 10x10 cm mesh. Affordable, easy to use, fully adequate.
Installation Step-by-Step
1. Frame preparation: Net needs stable frame. Wood frame (2x2 cm lumber), pipes, or purchased SCROG frame. Must be secured above plant – height roughly 30-40 cm above pot.
2. Net tension: Stretch evenly – not too tight (branches can't flex), not loose (control lost). Use rope or cable ties at frame corners.
3. Level check: Use a level tool to verify net is horizontal. Skewed nets lead to uneven canopy.
4. Light height: After net installation, position lamp so optimal PPFD reaches net height (typically 800-1000 µmol/m²/s for LED in bloom).
Pro Tip: Design frame with easy-to-remove net so repairs/replacements don't require room reconstruction.
Branch Training and Net Management
Phase 1: Vegetative Growth (Week 1-3)
After planting, the plant grows initially vertical. Net is not yet relevant. Develop 15-20 cm of main stem before training begins.
Phase 2: Branch Training (Week 3-6 Veg)
Net introduction: When branches reach ~10 cm length, begin guiding them under the net gently. This becomes a daily routine.
Method: Lateral branches are horizontalized by weaving them under net meshes. Branches grow horizontally and develop new shoots at internodes.
Pace: Quick but not forceful. Branches grow fast – daily checks and repositioning are necessary.
Goal: About 60-70% net fill by end of this phase. Typically 30-50 main branch points across net surface.
Phase 3: Final Prep (1 Week Before Switch)
Branches are still positioned, but intensive training stops. Plant needs 3-5 days rest before light switch for hormone adjustment.
Phase 4: Bloom and Net Use
After 12/12 light switch, branch dynamics change. Aggressive vertical stretch occurs (stretch phase). Branches break through the net – NORMAL and desired. Net now loosely guides and supports branches, not constrains them.
Management: Young shoots breaking through are gently guided back under, loosely supported. No forceful horizontalization anymore – stretch controls itself.
Optional Lollipopping: At bloom start, very weak lower branches can be removed to increase airflow and reduce Botrytis risk – not mandatory but helpful.
SCROG Timeline: Week by Week
| Week | Phase | Net Status | Actions | Target |
|---|---|---|---|---|
| 1-3 VEG | Setup | Net installed but unused | Plant grows vertical, build main stem | 15-20 cm height, 5-8 visible internodes |
| 4-6 VEG | Training | Branches under net | Daily positioning, fill 60-80% of net | 30-50 branch points, even surface |
| -1 VEG | Final Prep | All positioned | No new training, hormone recovery time | 100% net filled or minimal gaps |
| 1-2 BLOOM | Stretch | Branches push through | Gentle support, control height | Controlled vertical growth, no lodging |
| 3-8 BLOOM | Flower Development | Net stabilizes branches | Minimal intervention, support only if needed | Reifung ohne Verformung |
Critical Point: When 70-80% of net is filled, the time for 12/12 switch has come. Too early = under-filled net, wasted light. Too late = branches push through chaotically.
SCROG vs. SOG vs. LST: Comparison
SCROG (Screen of Green)
One net, 1-4 plants, long veg (3-5 weeks). Goal: flat, highly-illuminated canopy with few large plants.
Best for: Medium to large grow spaces, growers with skill for training.
SOG (Sea of Green)
Many small plants (16-100+), short veg (1-2 weeks or none). No nets, each plant one cola. Goal: yield-maximization through volume.
Best for: Commercial growers, abundant plant space, limited headroom.
LST (Low Stress Training)
Branches bent with ropes/clips – no net. Passive spreading. Low time investment.
Best for: Beginners, small spaces, who don't want nets.
Yield Ranking (per watt): 1. SCROG (~1.5 g/W), 2. SOG (~1.2 g/W), 3. LST (~0.9 g/W), 4. Untrained (~0.6 g/W).
Common SCROG Mistakes
Mistake 1: Switching Too Early
Light switch before 70% net fill wastes light on empty space.
Mistake 2: Inconsistent Daily Management
SCROG requires daily attention. Miss a few days and it becomes chaotic – branches grow vertical, tangle, canopy becomes uneven again.
Mistake 3: Over-Training in Bloom
After switch, stretch controls itself. Forcing horizontalization in weeks 2-3 bloom deforms flowers and stresses.
Mistake 4: Net Too Tight
Over-tensioned net wounds branches as they thicken. Net should still "play" and support.
SCROG vs. SOG vs. topping: which technique for which setup?
Not all training methods suit every grower or space equally. This table helps you choose the right technique for your situation.
| Technique | Plants per m² | Veg time | Setup effort | Best strain type | Yield potential (g/W) |
|---|---|---|---|---|---|
| SCROG | 1–4 | 3–6 weeks | Medium (build net, daily training) | Slow-growing, large genetics | 1.4–1.6 |
| SOG (Sea of Green) | 16–100 | 0–1 week (mostly no veg) | Low (simple setup, mass management) | Fast-growing, clones | 1.1–1.4 |
| Topping + LST | 2–8 | 2–4 weeks | Medium (frequent cutting, learning curve) | Robust, mid-range genetics | 1.0–1.3 |
| Untrained (Single Cola) | 1–2 | 1–2 weeks | Very low (passive) | All strains | 0.5–0.8 |
- SCROG: If you have few plants (1–2) and patience for training. Best yield-per-m² efficiency.
- SOG: If you have many clones available and want fast production. Less finesse, more volume.
- Topping/LST: If you're a beginner or unwilling to build a net. Simpler, but slightly lower yield.
Installing and optimizing your SCROG net
Material selection and mesh size
Net material choice affects durability, handling, and plant-friendliness. The following guide helps you pick the right material for your setup:
- Hemp net (5–10 cm mesh): Standard material for beginners and pros. Gentle on branches, easy to handle, natural appearance. Durability: 2–3 cycles, then rots. Cost-effective (5–15 EUR).
- Plastic/Nylon (5–10 cm): Very durable (5+ years), low maintenance, cheap. Less gentle on branches — can splinter or tear. Ideal for professional, repeated use.
- Bamboo frame with twine: Natural material, visually elegant, but expensive and difficult to tension. Better for design-conscious indoor spaces.
Net height and tension optimization
Optimal net height: 20–30 cm above substrate (with average pot sizes of 10–20 litres). Too low causes early breakthrough; too high reduces utilization efficiency.
Tension level: The net should be firm but not over-tight. A good rule of thumb: you should still be able to push the net down about 2–3 cm with your finger without it sagging.
Timing: when to install, when to stop training
Installation: Net is built in veg week 1–2, but active training (pulling branches under net) starts only when shoots reach ~10 cm length.
Training stop: With bloom onset (12/12 light switch), aggressive training should end. By week 2–3 of bloom, the stretch phase is over — new shoots should only be gently bent under the net, not forcefully trained.
Critical note: After the light flip, stems and branches become more brittle. Aggressive pulling through the net after week 2–3 bloom can cause breaks and deformations. The plant self-trains via the stretch phase — your job is to support, not control.
Frequently Asked Questions
How high should the SCROG net be?
Net should hang 30-40 cm above pot rim. For smaller spaces 25-30 cm, larger spaces up to 50 cm. Height depends on plant size and headroom. Too low = branches grow above net. Too high = longer veg needed. Standard is 35 cm.
When is the right time for the 12/12 light switch?
Optimal: when 70-80% of net is filled with branches. Typically 2-4 weeks veg depending on genetics and net size. Too early = net stays under-filled, wasted light. Too late = branches push through uncontrollably.
Can I use SCROG with autoflowers?
Not classically. Autoflowers can't be trained like photoperiods. Very early, gentle LST (Low Stress Training) with a net from day 10-14 is possible. True SCROG only works with photoperiod genetics and controllable veg phase.
How many plants do I need for a SCROG?
Depends on net size and veg length: 1 plant per 0.25-0.5 m² with longer veg (4+ weeks), or 2-4 plants with shorter veg (2-3 weeks). Standard: 1 plant per 30-50 cm square of net. Fewer plants = longer veg phase.
What happens if a branch under the net dies?
Remove dead branches quickly – they become pathogen reservoir. Single dead branch is usually not critical – plant has reserves. Multiple dying branches signal pest, nutrient deficiency, or watering problems. Quick diagnosis is important.