SUBSTRATE & PREPARATION
Buffering Coco Substrate: Why CalMag Before First Watering Is Non-Negotiable
Coco substrate has a unique property: it binds calcium and magnesium from your nutrient solution with high affinity. Without pre-treatment (buffering), this causes Mg and Ca deficiency in the first weeks. This guide shows you how to properly buffer coco to avoid deficiency symptoms from day one.
How coco fibers bind nutrients: cation exchange explained
Coco-coir has high cation exchange capacity (CEC)—its surface carries negative charges that attract and bind positive ions (cations): calcium (Ca²⁺), magnesium (Mg²⁺), sodium (Na⁺) and potassium (K⁺). Raw coco comes pre-saturated with sodium and potassium from historical saltwater storage. When unbuffered coco meets a nutrient solution, rapid ion exchange occurs: the Na and K in the fibers exchange out while Ca and Mg from your solution bind in. The problem: coco has huge capacity for this exchange, so it "sucks" massive amounts of Ca and Mg from your solution, creating imbalance.
Core principle: Buffering pre-saturates exchange sites with Ca and Mg before planting. Then less exchange occurs later, and your nutrient solution stays balanced.
The calcium-magnesium trap: what happens without buffering
Without buffering, expect weeks 2-3 symptoms: yellowing between leaf veins (Mg deficiency), stem discoloration, new leaf tip burn (Ca deficiency). Growth slows, yields drop. While you can correct with extra CalMag later, the early deficiency stress is never fully recovered. Better to prevent from the start.
| Symptom | Buffered Coco | Unbuffered Coco |
|---|---|---|
| Weeks 1-2 leaf color | Healthy green | Normal, no visible symptoms yet |
| Weeks 2-3 leaf color | Still healthy | Yellow vein patterns, tip burn appear |
| Weeks 4+ growth | Optimal | Delayed, partial recovery possible with extra CalMag |
Coco buffering step by step: safe protocol
-
Step 1: Loosen and initially water coco
Open the compressed coco block. Place in bucket and water with plain water to field capacity (moist, not dripping).
-
Step 2: Prepare CalMag buffer solution
Mix 2-5 mL CalMag per liter water (check label concentration). pH to 6.0-6.5 with pH down or up. Prepare enough for 2x the coco volume.
-
Step 3: Pour CalMag solution through coco
Slowly pour the solution through the moist coco. Runoff should flow out the bottom. Mix gently to ensure even distribution.
-
Step 4: 30-60 minute soak
Let sit undisturbed. Cation exchange happens during this time. Then flush with nutrient solution once. Measure runoff pH (target 5.8-6.2).
Buffer solution concentration by brand
| CalMag Brand | Buffering Dose | Notes |
|---|---|---|
| Canna CalMag | 3-5 mL/L | Standard, well-proven. |
| General Hydroponics | 2-4 mL/L | Moderately concentrated. |
| Generic brands | 5-10 mL/L | Often weaker, higher dose needed. |
| Pre-buffered coco | Not needed | Already buffered by manufacturer. |
pH control during buffering: target values
pH of buffer solution before pouring: 6.0-6.5 (optimal for cation exchange). Runoff pH during buffering: often 6.5-7.0 (normal, shows buffering is working). Runoff pH after flushing with nutrient solution: target 5.8-6.2 (ideal for coco). If pH too high after flush, rinse again with slightly acidic water (pH 5.8-6.0).
Common buffering mistakes and consequences
-
Mistake 1: Too short soak (under 15 minutes)
Insufficient cation exchange. Risk of Mg/Ca deficiency weeks 2-3. Always 30-60 min minimum.
-
Mistake 2: CalMag dose too low
If dose is 1 mL/L instead of 3-5 mL/L, saturation insufficient. Later, deficiency symptoms appear. Measure runoff EC after buffering—should be 0.4-0.6 (shows Ca/Mg presence).
-
Mistake 3: Skipping the flush
If you don't flush with nutrient solution after buffering, too much residual solution remains in pores. Initial EC is too high, salt stress. Always flush once.
-
Mistake 4: pH not adjusted on buffer solution
Unadjusted pH reduces exchange efficiency. Always pH to 6.0-6.5. Takes 5 minutes, saves weeks of trouble.
Why coco needs buffering: the cation exchange chemistry
Coco coir is unique among grow substrates because of its high cation exchange capacity (CEC)—the number of negative charges on fiber surfaces that attract and bind positively charged nutrient ions. Understanding this chemistry explains why buffering is non-negotiable, not optional.
What is Cation Exchange Capacity?
CEC measures how many positive ions a substrate can hold per unit mass, typically in milliequivalents per 100 grams (meq/100g). Coco coir has CEC of 100-200 meq/100g, which is exceptionally high—far higher than peat moss (50-80 meq/100g) or rockwool (near 0). This high CEC is both a blessing and a curse: coco holds and buffers nutrients well, but it also "sucks" nutrients from solution aggressively.
The Calcium-Magnesium Binding Problem
Raw coco arrives pre-saturated with sodium (Na⁺) and potassium (K⁺) from historical saltwater exposure during production. When you introduce your carefully balanced nutrient solution (containing Ca²⁺ and Mg²⁺), rapid cation exchange occurs at the fiber surface. The substrate releases Na and K while greedily absorbing Ca and Mg. The result: calcium and magnesium concentrations in your root zone plummet, even though you're feeding "correct" levels. Plants show deficiency symptoms by week 2-3 not because you underfed, but because the substrate intercepted the nutrients.
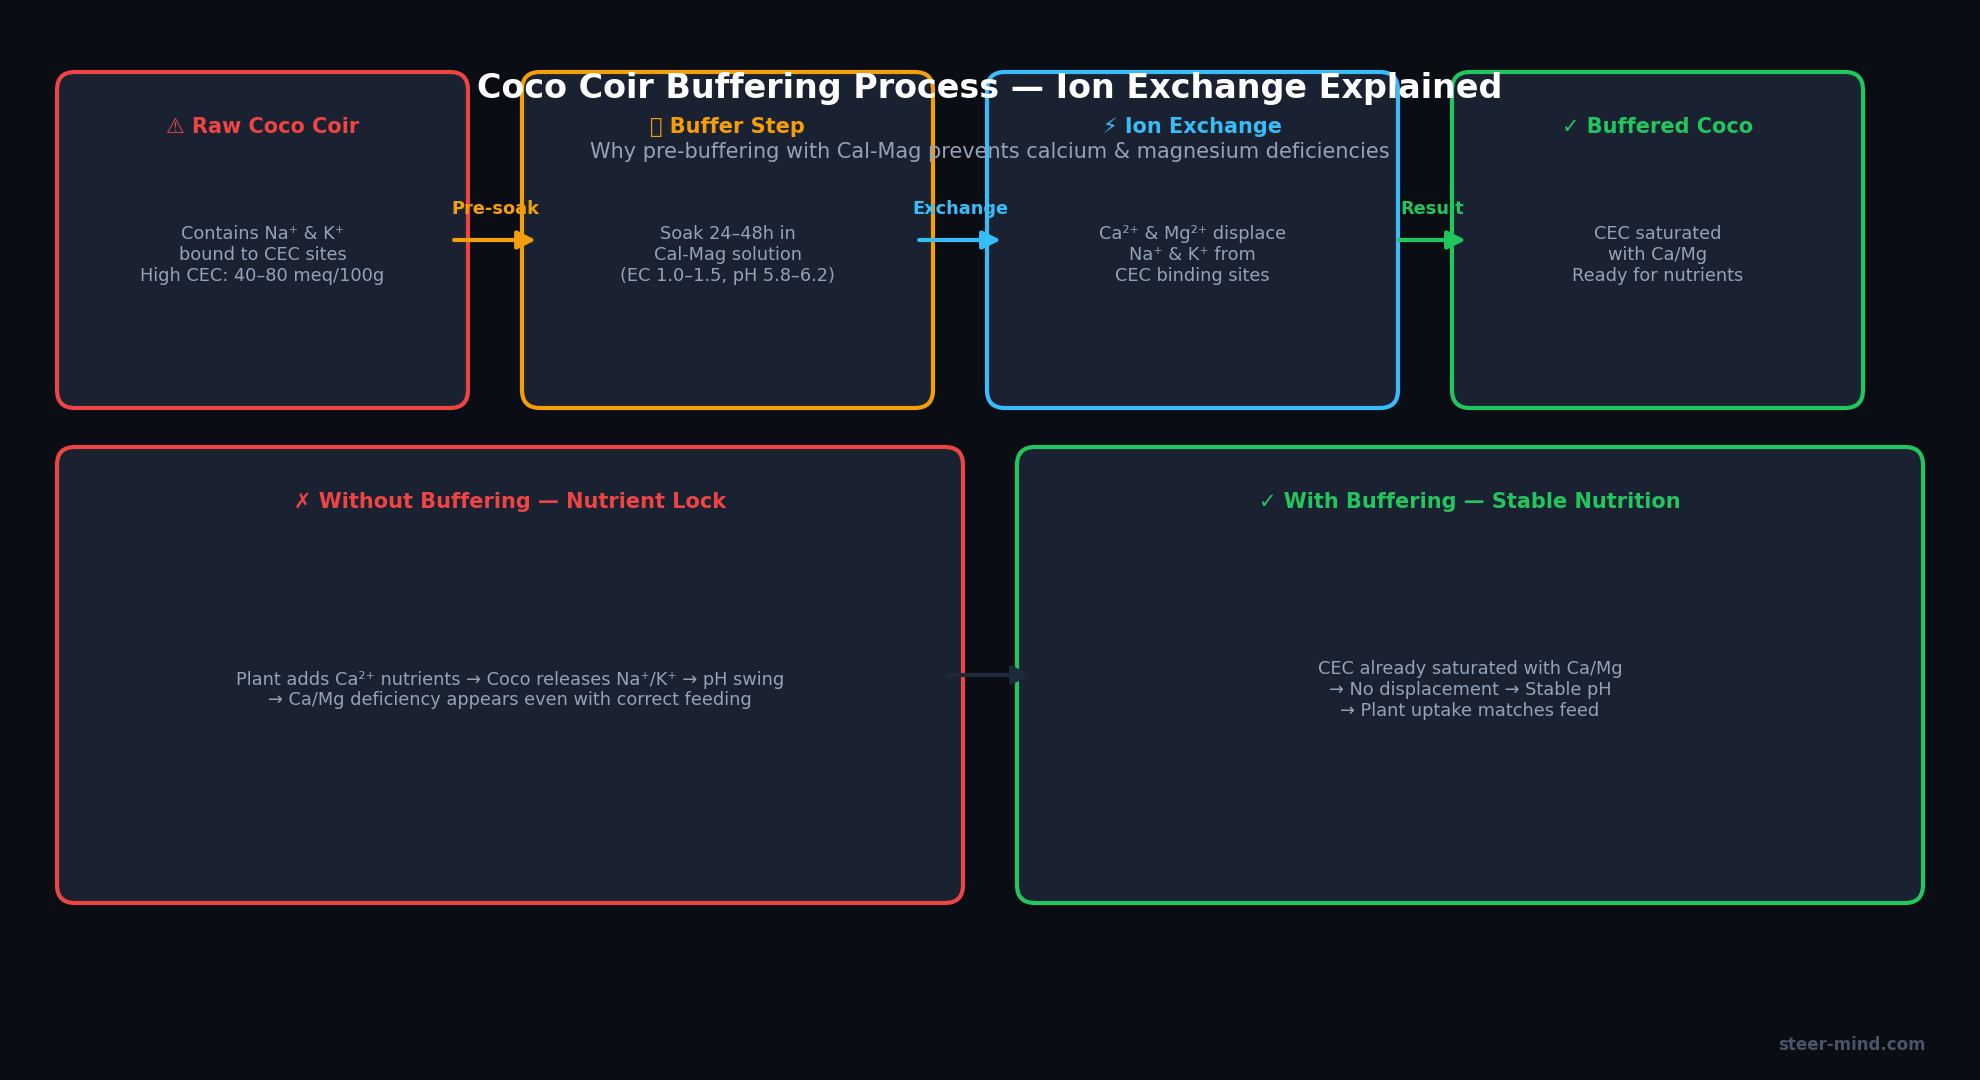
Simple CEC Diagram Concept
Unbuffered Coco (Day 1): Fiber surface has Na/K ions. When nutrient solution added: Na/K release out, Ca/Mg pull in. Plant root sees high availability initially, but substrate "hunger" for Ca/Mg rapidly depletes solution concentration.
Buffered Coco (Day 1): Fiber surface pre-saturated with Ca/Mg. New nutrient solution added: minimal exchange occurs because sites already occupied. Solution Ca/Mg stays stable. Plant roots access consistent availability throughout growth.
Why pH Matters in Buffering
The efficiency of cation exchange depends on solution pH. At pH 6.0-6.5 (optimal for buffering), exchange rates are fastest and most complete. At pH above 7.0 or below 5.0, exchange is sluggish, leaving some sites unfilled. This is why buffering instructions specify pH 6.0-6.5 for the buffer solution—you're maximizing exchange efficiency in a single application.
After buffering, your substrate cation exchange sites are "satisfied" (Ca/Mg dominant), and subsequent pH fluctuations in growing solution have minimal impact on nutrient availability. Pre-buffering insulates you from pH drift problems that plague unbuffered coco.
Practical Consequence: Why Expensive Pre-Buffered Coco Exists
Companies like Canna, Plagron, and FoxFarm sell pre-buffered coco at 15-30% premium ($15-25 per 50L block instead of $10-15). You're paying for the exchange sites to be factory-saturated with Ca/Mg. This eliminates your buffering step—you can plant directly after a single rinse. The premium is insurance: zero risk of missed buffering, zero deficiency risk. Smaller growers or hobbyists who buffer at home save money. Commercial growers often prefer pre-buffered for consistency and speed.
Buffering step-by-step: exact concentrations and timing
A precise protocol eliminates guesswork. Follow these six steps with exact measurements for consistent results every grow.
-
Step 1: Prepare and loosen compressed coco
Remove compressed coco block from packaging. Break apart with hands or hoe. Place in food-grade bucket or bin. Volume should not exceed 50% of bucket height (room for mixing and water distribution).
-
Step 2: Initial water rinse to field capacity
Add plain RO or dechlorinated tap water (not pH adjusted) until coco is moist throughout but not waterlogged. Target: field capacity (squeeze test: one drop of water emerges, no stream). This typically requires 2-4 liters per 50L of compressed coco. Let sit 10-15 minutes.
-
Step 3: Prepare CalMag buffer solution
Mix in separate container:
- 2-5 liters of RO water (volume = approximately 2x the pre-hydrated coco volume)
- CalMag: 4-8 mL per liter (standard: 2 mL/L for light buffering, 4 mL/L standard, 8 mL/L heavy buffering for very high EC strains)
- pH the solution to exactly 6.0-6.5 using pH Up or pH Down (test with calibrated pH meter, not pH paper)
- EC target: 1.2-1.5 mS/cm (shows adequate Ca/Mg presence). Measure with EC pen before pouring.
-
Step 4: Slowly pour buffer solution through coco
Pour the CalMag solution slowly (takes 5-10 minutes) through the pre-moistened coco. The solution should flow out the drainage holes in the bucket bottom. Mix gently with hands or paddle to ensure even distribution and avoid dead spots. All coco should contact buffer solution, not just the top layer.
-
Step 5: Soak for 24-48 hours minimum
Let the buffered coco sit undisturbed for at least 24 hours (48 hours preferred for heavy/slow-buffering). During this time, cation exchange reaches completion. Temperature matters: warmer conditions (20-25°C) speed exchange; cooler (below 15°C) slow it. Do not drain excess solution prematurely.
-
Step 6: Flush with nutrient solution and pH check
After soak, slowly pour 1.5x volume of your planned grow nutrient solution (full EC, target pH 5.8-6.0) through the coco. Collect runoff. Measure runoff EC (target: 0.4-0.7 mS/cm, showing Ca/Mg presence but not excess) and pH (target: 5.8-6.2, ideal for coco). If runoff pH above 6.5, rinse once more with slightly acidic water (pH 5.8). Coco is now ready to fill pots or beds.
Quality Assurance After Buffering
Before filling pots, verify successful buffering with three quick tests:
- Runoff EC test: Collect runoff after nutrient flush. EC should be 0.4-0.8 mS/cm. Below 0.3? Buffer sites weren't filled—rebuffer. Above 1.0? You over-buffered or used very concentrated CalMag—one additional rinse.
- Runoff pH test: Should be 5.8-6.2 after nutrient flush. Above 6.5? Extra rinse needed. Below 5.5? Pre-acidify your rinse water to pH 6.0 and repeat.
- Visual test: Squeeze handful of buffered coco. Should feel moist, hold shape briefly, then crumble. Too wet = oversaturated, squeeze out excess or spread on cloth to air-dry 1-2 hours. Too dry = not enough soak time.
Critical timing notes: Never skip the 24+ hour soak. Buffering requires time for the fibers to equilibrate. A 15-minute "quick soak" leaves 40% of exchange sites unsaturated, guaranteeing deficiency weeks 2-3. Budget 2-3 days (including soak time) for each buffering batch. Plan your grow schedule accordingly—start buffering coco 3+ days before transplanting.
Common buffering mistakes and how to fix them
Experience growers know: small errors in buffering cascade into weeks of deficiency problems. Learn from the most common pitfalls:
| Mistake | Observable Symptom | Fix |
|---|---|---|
| Skipped buffering entirely | Week 2-3: yellow vein patterns on older leaves, leaf tip burn on new growth, growth stalls | Cannot fix mid-grow (calcium/magnesium lost to exchange is irreversible). Buffer from start next time. Current grow: boost CalMag 50% (to 6-10 mL/L) immediately, increase watering slightly to push dilution. |
| CalMag dose too low (1-2 mL/L) | Weeks 2-3: same deficiency symptoms as skipped buffering. Runoff EC stays below 0.3 despite normal feeding. | Runoff EC test reveals problem. Increase CalMag dosage in nutrient solution to 5-8 mL/L. For future: use 4-5 mL/L minimum in buffer solution. |
| Soak time too short (<8 hours) | Week 2-3: Mg deficiency emerges, but more gradual/mild than complete skip. Partial buffering incomplete. | Increase soak time to minimum 24 hours next time. Current grow: as above, boost CalMag and monitor closely. |
| Buffer pH not adjusted (added CalMag to plain water, no pH adjustment) | Runoff pH unstable, drifts above 6.8 or below 5.5 within first week. Cation exchange incomplete. | Future: Always pH buffer solution to 6.0-6.5. Current grow: conduct mid-grow pH buffer rinse (pour 1x volume of pH 6.2 CalMag solution through, wait 12h, flush with nutrient). Recover 60-70% of lost buffering capacity. |
| Used high-EC tap water for initial rinse or buffering | Root zone EC high from day 1 (0.6+), salt stress, growth slow, runoff EC 2.0+ | Always use RO water or low-EC water (<0.2 mS/cm) for buffering. Tap water minerals compete with CalMag. Current grow: heavy flushing (1.5-2x volume daily) for 3-5 days to dilute. Use RO for all rinses forward. |
| Did not pre-rinse coco, jumped straight to buffer | Initial EC very high (1.8+), salt stress from day 1 | Pre-rinsing with plain water removes excess salts from manufacturing. Skipping wastes the buffer solution. Current grow: flush heavily and add humidifier to offset stress. Future: always 2-step: plain water rinse → CalMag buffer. |
| Using generic/weak CalMag product | Runoff EC after buffering stays below 0.2 despite 8 mL/L dose. Weak formulation. | Some products are weak. Test runoff EC immediately after buffering—if below 0.3, product is poor. Switch brands (Canna, GH, General Hydroponics proven). Pre-buffered coco is worth the premium ($3-5 more per 50L) to eliminate this variable. |
| Not measuring EC or pH during buffering | Unknown if buffering succeeded. Plant symptoms appear (or don't) but no data to diagnose root cause. | Invest in an EC meter (~$20-30) and pH meter (~$15-30). Non-negotiable for professional buffering. Test: buffer solution before pouring (should be 1.2-1.5 EC, pH 6.0-6.5), runoff after soak (EC 0.4-0.8, pH 6.2-6.8), final runoff after nutrient flush (EC 0.4-0.7, pH 5.8-6.2). These three tests verify success. |
Troubleshooting Summary Table: Before vs. After Buffering
Use this quick reference to confirm your buffering was successful:
| Parameter | Before Buffering (Dry Coco) | After Buffering (Post-Flush) | Action if Outside Range |
|---|---|---|---|
| Runoff EC | N/A (dry) | 0.4-0.7 mS/cm | Below 0.3? Rebuffer. Above 0.9? Extra rinse. |
| Runoff pH | N/A (dry) | 5.8-6.2 | Below 5.5? Acidify rinse. Above 6.5? Extra rinse with pH 6.0 water. |
| Substrate moisture feel | Dry, crumbly, dusty | Moist, holds shape briefly, good drain | Too wet? Spread and air-dry 1-2h. Too dry? Add water, let sit 12h. |
| Color of coco | Light brown or golden | Slightly darker, no color change expected | Color change is normal (water absorption). No action needed. |
Frequently Asked Questions about Coco Buffering
Must I always buffer coco before use?
Yes, unbuffered coco should always be buffered. Raw coco binds calcium and magnesium, causing deficiency in weeks 2-3. Pre-buffered coco (Canna, Plagron) is optional but more expensive. Buffering takes ~2 hours and saves weeks of deficiency problems.
How long should buffered coco soak?
Minimum 30-60 minutes for complete cation exchange. Too short means incomplete exchange, risking later deficiency. Too long (over 24 hours) is harmless but unnecessary.
What happens if I don't buffer coco?
Weeks 2-3: Mg and Ca deficiency visible (yellow leaf veins, leaf curling, stem discoloration). Growth slows, recovery incomplete even with extra CalMag. Prevention is far better than cure—buffer from the start.
Can I buy pre-buffered coco?
Yes, brands offer pre-buffered versions at 20-30% premium. Saves time and eliminates error. Quality varies—buy from reputable brands (Canna, Plagron).
Do I need to re-buffer coco during growth?
No. Initial buffering plus ongoing CalMag supplementation (2-5 mL/L) in nutrient solution is sufficient. For coco recycling (multiple harvests), optional light re-buffering may help, but usually not necessary.